rFactor2 Log Analyzer Guide
Contents
Introduction
After every session rFactor2 saves report xml file with various per driver/per lap data (positions, lap and sector times, fuel, tire wear, etc).
rFactor2 Log Analyzer (or r2la) is the tool to read and manage these xml files. It creates database of your session logs, represents them as session reports, records your best times, allows you to manage offline or online championships, export session reports to static html files.
You can edit results: change driver name, position, finish time/status, laps completed, disqualify driver, add time penalty. See "Editing results" section for more info.
In "DEDI mode" you can host r2la on dedicated server for your community. Among other things DEDI mode allows to setup hotlap competitions based on filtering session xml files data.
There is Live Timing page to follow live sessions, which supports multiple rFactor servers (hosted on the same machine).
r2la also supports Le Mans Ultimate, rFactor1 and Automobilista logs.
Installation and setup
rFactor2 Log Analyzer does not require installation. You run a bat file which starts webserver on localhost and you access application in your browser.
How to run rFactor2 Log Analyzer for the first time, step by step:
-
Unzip "rF2 Log Analyzer ver. x" folder somewhere on your hard drive.
-
Run r2la.bat. Small cmd window will pop-up, local web server will start.
-
Open address http://127.0.0.1:8000/ in your browser.
-
When running app for the first time, enter a full path to your rFactor2 root folder in the form.
-
When you finished working with r2la, you can close local web server window.
Note: Some actions, like importing log files for the first time or deleting log files may take about 10-20 seconds (depends on number of logs in directory), please wait.
Please note:
-
you need to press "Refresh" button in r2la for it to rescan /Results directory and pick-up new log files
-
r2la only reads/shows xml log files and data which exist in your rFactor2\UserData\Log\Results directory at present time, it does not copy/store them. If you want to back-up your data, then you need to back-up actual xml log files.
-
when you remove some logs with r2la, it does not actually remove log files, but moves them to rFactor2\UserData\Log\Results\temp directory. You can move/restore them back manually if you need.
-
try to keep number of log files to a minimum for best performance. Remove "empty" and old irrelevant log files.
Installation and setup in DEDI mode
Instructions for league and server admins. How to run rFactor2 Log Analyzer in DEDI mode for the first time, step by step:
-
Unzip "rF2 Log Analyzer ver. x" folder somewhere on your dedicated server.
-
First we need to start web2py server in localhost mode to set admin account and rF2 path.
-
Start rF2 Log Analyzer ver. x\web2py\web2py.exe. Select "Local" server IP. Press "Start server"
-
Go to address http://127.0.0.1:8000/ in a browser on dedicated server.
-
Fill out the form. Set rFactor2 path on this dedicated server or path to your log files directly, check "DEDI mode", fill out Administrator Name and Password fields. Press "Start r2la" button.
-
If r2la DEDI finds your rF2 dir and starts, you can close web2py server (web2py.exe).
-
Start rF2 Log Analyzer ver. 2.x\web2py\web2py.exe again.
-
Now select "Public" server IP (choose option with your dedicated server IP).
-
As long as web2py.exe will be running other people will be able access r2la DEDI at chosen IP and port.
-
Admin (or admins) of your community must login to r2la DEDI with Nick/Name and password entered in step 5.
-
When logged in, admin will see all the buttons to manage r2la DEDI.
Please note:
-
there is "Auto refresh" mode, which you can turn on at Options page.
-
if "Auto refresh" mode is OFF, admin must press "Refresh" button for r2la DEDI to pick-up new xml logs.
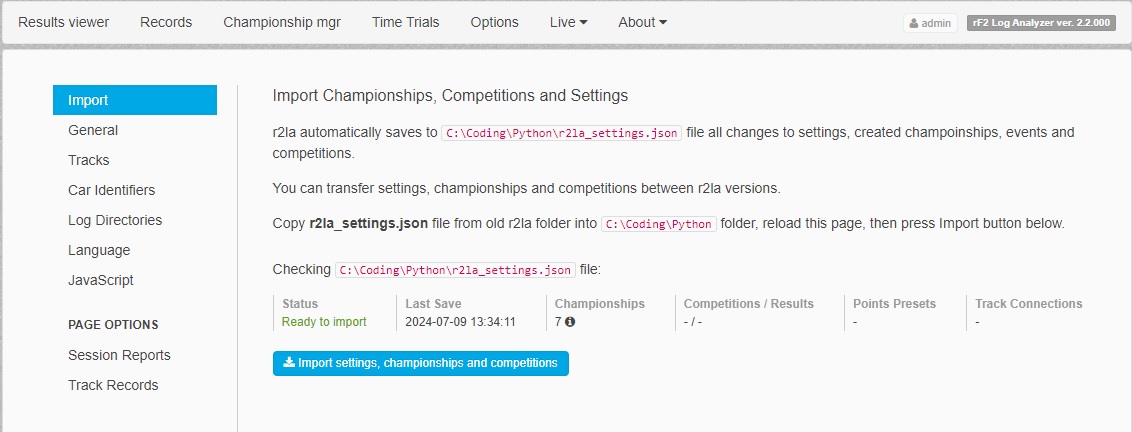
Upgrading to newer version of r2la
You can not just rewrite old r2la files with new ones because every new version can have different database structure. You need to start new version "from scratch". You can import your Championships, Competitions and Settings from older version into new one.
How to start using new version of r2la:
-
Good rule is - do not remove your old version of r2la until your are sure that you imported your data to new version and its running correctly.
-
Download new version of r2la.
-
Unzip new version "rF2 Log Analyzer ver. x" folder somewhere on your PC or dedicated server.
-
Copy r2la_settings.json from old version folder to a new version folder you just unzipped.
-
Run new version of r2la and make sure it found rFactor2 and started OK.
-
Go to Options page and press "Import settings, championships and competitions" button.
Results viewer
Results viewer lets you select and view any log file from your rFactor2\UserData\Log\Results directory.
Also you can:
-
Refresh - press this button to rescan directory for new log files
-
Filter reports by Session, Track name, Car Class, date, Server Name, Championship, Track Record, Competition
-
Clone to edit - create an editable copy of this log file
-
Edit - edit cloned file: change driver name, position, finish status, disqualify or add time penalty. See "Editing results" below.
-
Export report - export session results to static html file
-
Open selected .xml - open selected .xml file in browser
-
Remove selected - remove selected .xml file (file will be moved to rFactor2\UserData\Log\Results\temp directory)
-
Select multiple - to delete multiple logs, this will show checkboxes for multiple selection. Select, then press "Remove selected"
-
Remove logs with no time set - remove all "empty" .xml files where nobody set laptime (files will be moved to rFactor2\UserData\Log\Results\temp directory)
-
Remove logs not assigned to championships
-
Remove all Race/Qualy/Practice session logs
-
Compare all logs for this car and track - open separate view with all logs for this car/track only
-
Use Batch file editor to create rFactor batch.ini file inside your ../Results directory
-
Turn pagination on for Results Viewer selector if you have a lot of log files.
-
Create Competition for selected xml (for DEDI mode) - will open Create Competition page setting field values to data from selected log file.
Championship manager

- manage your online or offline championships
- support for teams and classes
- teams can be automatically selected from CarType, CarClass, TeamName, VehName tags or created and assigned manually
- classes can be automatically selected from CarType, CarClass, TeamName tags or created and assigned manually
- support for drivers moving between teams and classes at different races during championship
- customizable points system for 50 places, plus bonuses for pole position, fastest lap, one lap led and max laps led
- points presets for all major racing series included
- driver statistics for championship
- car statistics selectable by CarType, CarClass, TeamName, VehName tags
- customizable minimum distance for classification, number of team cars that awarded points, number of worst driver results in championship that won`t be counted
- support for manual race points override, in case of penalties, disqualifications, custom bonuses, etc.
- export of championship tables to html
- transfer your championships between r2la versions by importing r2la_settings file
- if racing with AI, you have to ensure by yourself consistent driver names and performances at every race during championship
- do not delete .xml logs that you assigned as results for races in championship, they are accessed every time you browse championship
-
Race can have long race name and race country. Press "Edit race" then "Edit more race settings" to set them.
Long name is used for race select buttons if defined. Short race name will be used anywhere if long name is not defined, and
only in tables if long name is defined. Country flag will be displayed in championship tables.
You can add your flags if you need, their names are read only at the first start of clean r2la,
put them in web2py\applications\r2la\static\images\flags folder before you start r2la for the first time.
Flags are from gosquared. https://www.gosquared.com/resources/flag-icons/
-
You can add background image for championship page and/or for championship top panel.
To do this, put .jpg files into web2py/applications/r2la/static/images/championships/ folder.
File name must be championship name, following this rules:
- if championship name contains spaces, in file name you should replace them with underscore _
- for page background image file add _bg to file name
- for top panel image file add _top to file name
Example: My_GT3_bg.jpg My_GT3_top.jpg
Editing results


-
To edit log results, you first need to create an editable copy of this log.
-
Press "Clone to edit" button, that will create a copy of selected log file.
Copy will have the same name, but with "E" added to the end.
Copied file will be highlighted with the blue color in log selector.
-
Only cloned/copied file will be available for edit. Original file will remain intact.
-
Select cloned file and press "Edit" button.
-
You can Edit drivers result directly or Disqualify driver or add Time Penalty.
Time Penalty option is only available for drivers that are on the same lap and have finished the race.
You can move any driver to any position manually by pressing "Edit" button, if Time Penalty option is not enough for you.
-
For races with driver swaps you can change driver name to one from the list of swapped drivers for this car with drop-down selector helper.
Its useful when you need to select the same driver name for all championship races with swaps.
-
If you change drivers name in race log, do not forget to change this name in Qualy log also and vice versa.
-
Trailing whitespaces in driver names are marked with exclamation-circle icons on editor pages.
Track records
Car identifiers
Track records are created for every TrackCourse and car identifier string, which consists of user defined
combination of Cartegory (most often first value of the Category list), CarType, CarClass and TeamName.
By default every new Category+CarType combination encountered will have
CarType as identifier, exept for mods that have identifier combination already preselected by me (ASR Formula`s, F1RFT 2013, AMGT3, ISI`s cars).
For example, ASR Formula`s mods will have CarType+TeamName identifier, i.e.
ASR Formula OWC 92+McLaren-Honda, so that cars with different physics had
thier own records logged.
You can change car identifier string for any car at any time by clicking on Menu Button in any records table Row and selecting Change identifier
from drop-down menu or on Options - Car Identifiers page.
Track flags
Tracks are assigned countries/flags automatically according to internal database when you first start r2la. But it is not possible to know and enter into database all track names. For tracks that have no flags on r2la pages, you can assign country/flag on Records page or on Options - Tracks page. Click on grey icon to the left of track name.
Merging records from identical tracks
Sometimes physically identical track versions have different TrackCourse strings.
For example Sepang track from F1RFT 2013 track pack is the same as ISI`s Sepang track.
You can merge track records for tracks like this on Options - Tracks page.
Time Trials
Time Trials (optional) are available for non-DEDI mode only. Its a way to compare your multiple race runs of the same distance on the same track. Cars might be different on every run. Time Trial is structured similar to championship. You can create several events with different tracks in one Time Trial. Then add Race logs to event.
Conditions when adding log files to event are: xml file must contain driver with a name matching the one you provided when creating Time Trial, and all Race runs for event must have the same length in laps and done on the same track.
For example, you can create Time Trial with "Endurance TT" name and add your player name. Then create several events with names of tracks, like "Spa", "Imola", etc. Then run several races at Spa offline, with or without AI, with the same or different cars, but all races 10 laps long. Then add all this race logs to Spa Time Trial event you created. You will see Results and Laps tables on event page, where you can easily compare overall run time, best lap times, sectors, top speed (for LMU), fuel and tire wear, consistency between race runs.
Live Timing
For server to output data - you need to download rF2 Shared Memory Tools for Developers, extract rFactor2SharedMemoryMapPlugin64.dll into your rFactor 2\Bin64\Plugins directory, start rF2, go into Options/Plugins and turn ON rFactor2SharedMemoryMapPlugin64.
For LiveTiming to work you need to start r2la on server machine by r2la_live_timing.bat file. For LiveTiming to work properly always start r2la_live_timing.bat before you start rF2 session.
Clients don`t need to do anything new, just go to server`s r2la Live page. LiveTiming also works if you use rF2 offline, just install Shared Memory plugin and start r2la by r2la_live_timing.bat.
For rFactor1 and Automobilista you need to use modified version of rFactorSharedMemoryMap plugin. Download it here. Put rFactorSharedMemoryMapDedi.dll into rFactor or Automobilista\Plugins directory. Remove rFactorSharedMemoryMap.dll if you had it there. rF1 mode limitation - human players will have AI status when standing in pits, no vehicle names, no tire compounds info.
Live Timing settings
You can set Live Timing settings (before launching Live Timing) in rF2 Log Analyzer ver. x\web2py\applications\r2la\live_timing_settings.json file. 0 is Off, 1 is On.
-
read_global_memory, default 0. Only use for troubleshooting, if Live Timing is not working and you are using rFactor with Windows system that has several user profiles
-
show_ai_fuel_data, default 0
-
show_ai_tire_wear, default 0
-
show_ai_column, default 1
-
show_avg_lap_speed, default 0
-
show_class_column, default 1
-
show_mph, default 0
-
show_tire_data, default 1
-
show_vehicle_column, default 1
-
show_iframe, default 0. Set to 1 to turn iframe on.
-
iframe_src, link to your page to appear in iframe.
-
iframe_style, iframe style css options can be added to scale iframe content on page, for example, "height:300px; width:300px; transform: scale(0.75);".
iframe option Can be used to embed animated track maps from other live timing plugins, for example.
If you have multiple servers on Live Timing page, iframe will be the same for all of them.
-
show_img_column1, default 0. Show column 1 with images.
Put png images into rF2 Log Analyzer ver. x\web2py\applications\r2la\static\images\tables folder.
Image filenames should match corresponding source column cell value.
Replace all non-alphanumeric characters and spaces in filenames with _ (underscore) symbol.
-
img_column1_source, default "class". Image column 1 file name source.
Select one from "driver", "class", "vehicle", "vehicle_with_num".
-
show_img_column2, default 0. Show column 2 with images.
-
img_column2_source, default "vehicle". Image column 2 file name source.
Select one from "driver", "class", "vehicle", "vehicle_with_num".
Live Timing troubleshooting
If everything is setup, but Live Timing page still shows no servers, try this steps one by on (not all at once):
-
Make sure you (re)installed Runtimes from
rFactor 2\Support\Runtimes on your server.
-
After you run
r2la_live_timing.bat, you can check rF2 Log Analyzer ver. x\web2py\r2la_live_timing.log file, if there is some error there.
-
Make sure
DebugOutputLevel variable in rFactor2SharedMemoryMapPlugin64 section in CustomPluginVariables.JSON is set to 2. Start your dedi server, add 1-2 AI, close dedi server. Go to rFactor 2\UserData\Log folder and find RF2SMMP_DebugOutput.txt file. If there is no such file - then rFactor2SharedMemoryMapPlugin64.dll plugin did not even start for some reason (one reason can be - Runtimes are not installed, other reason - "Enabled" variable set to 0, or something else preventing plugin from work). If there is a file, open it, there should be no errors and a message like "...Files mapped successfully" in some line.
-
Try to use global memory:
-
Turn off r2la and rF2 server.
-
Set
DedicatedServerMapGlobally value to 1 in rFactor 2\UserData\player\CustomPluginVariables.JSON file.
-
Set
read_global_memory value to 1 in rF2 Log Analyzer ver. x\web2py\applications\r2la\live_timing_settings.json file.
-
Restart r2la and rF2.
-
If still not working, try to start both
r2la_live_timing.bat and rF2 Dedi "as an administrator" (with admin privileges) in windows.
-
Set both back to 0 if it will not work.
-
If LiveTiming is not working on your server, you at least can try to make it work on you local PC in single player mode, to see if you can make it work at all. Install r2la and
rFactor2SharedMemoryMapPlugin64.dll on your PC, set variables in CustomPluginVariables.JSON, as you would on dedi server, but start single player race with some AI and look at LiveTiming page. Make sure that you start r2la with r2la_live_timing.bat file.
Telemetry
-
You will need rFactor2SharedMemoryMapPlugin for rF2. Extract
rFactor2SharedMemoryMapPlugin64.dll into your rFactor 2\Bin64\Plugins directory, start rF2, go into Options/Plugins and turn ON rFactor2SharedMemoryMapPlugin64.
-
For rFactor1 and Automobilista you will need rFactorSharedMemoryMap plugin 2.0 or modified version of it. Either one should work for telemetry.
-
r2la telemetry does not feature all data channels. If you need detailed rF2 telemetry analysis, use complete telemetry viewing systems, like DAMPlugin + "Motec i2".
-
To record telemetry data, start r2la by
r2la_telemetry.bat. Then start rF2 and as soon as your car leaves the pit lane, data will be recorded. You don't need to start web browser to record telemetry. Telemetry data will be written to r2la database every time you return to pits.
-
You can view list of recorded telemetry laps by clicking "Live" -> "Telemetry" on top r2la nav panel. Click "Open" to open Telemetry Viewer for selected lap.
-
You can pan graphs by dragging them with LMB and zoom with mouse wheel. You can overlay other lap graphs on top of opened one or add another lap graphs to Telemetry Viewer page.
-
Recorded telemetry data will be visible at "Stints" tab in session xml report. Press "Show telemetry data" button there.
-
You can record telemetry for AI car (only for rF2). Set
record_ai value to 1 in rF2 Log Analyzer ver. x\web2py\applications\r2la\telemetry_settings.json. In-game add 1 AI car in options or on track. When AI car will leave the pit lane its data will be recorded. You have to wait for AI to return to pits for data to be recorded into database.
-
rF1 and Automobilista have some telemetry data channels at 0.
-
While recording r2la telemetry should not have effect on rF2 performance, I do not recommend using it when you are participating in important online events. Better use it for offline test sessions only.
-
Telemetry data is not transferred between r2la versions on updates.
r2la DEDI Hotlap Competitions
If you host r2la DEDI, you can create a Hotlap Competitions for your friends/community. Lap times will be collected from log reports available in Results Viewer depending on options that you select when creating Competition.
You can export competition results to "fake" xml file and then assign this reports as results in your championships. Press "Export to XML" button for some competition, this will create "Practice" xml report with competition results in your default .../Results directory and import it in r2la. You will see it in Results Viewer with the same name as competition plus "_". Report will be dated by competition end date.
Private mode
You can run DEDI version in "Private mode". If activated, it will require users to enter a password to see r2la DEDI pages. Qualy and Race Chat is visible only to admin in Private mode.
Internationalization
r2la supports internationalization for top menu, championship menu and some championship tables strings. Language selector is at the Options page. Language files are in
web2py\applications\r2la\languages
directory. Only possible r2la strings for translation are in the languages\default.py file, at the end of the file. Insert r2la dictionary part from default.py to the end of your language file and substitute words after ":" to translations. For example, "Results viewer": "Resultats sessions", for French (fr.py file).
Customizing css
Custom tire compound badge colors
You can change or add your own tire compound badge colors at the end of web2py\applications\r2la\static\css\app.css file.
If tire compound name contains white-spaces, you should replace spaces with underscore "_".
For example, to select Super Soft tire badge, css class selector must be ".compound-Super_Soft"
Custom Race/Qual/Practice badge colors
You can customize race/qual/practice badge colors by finding and changing css classes .uk-badge-race .uk-badge-qual .uk-badge-practice in web2py\applications\r2la\static\css\app.css file.
Custom car class badge colors per Championship
You can change class badge color by adding values at the end of web2py\applications\r2la\static\css\app.css file. It should look like this: .uk-badge-class0-championship_name {background-color: #your_color}. Where "championship_name" is the name of the championship for which you need to change class badge color, replace "spaces" in championship name with "_" (underscore) symbols. You can change class badge colors for all championships by changing values for classes .uk-badge-class0 (0 to 4) in app.css file.
Custom Championship standings table cell colors
In web2py\applications\r2la\static\css\app.css file, change hex color codes for classes that start with "cellbg_" prefix ("cellbg_1st", "cellbg_2nd" and so on). Save changes. You might need to press CTRL+F5 on r2la page in your browser to pick up changes made to css file.
Adding banners/images to r2la pages
For all pages
Custom banner will appear on all pages below navbar. Put your image (jpg, jpeg, gif or png) into applications\r2la\static\images\custom_site_banner folder, then turn "Show custom banner" ON on Options page. Widths more then 1130px will be resized to fit. Less then 1130px will be centered. Banner will act like a hyperlink if an optional Banner Link address is provided. If you need to change your Banner, put new file in folder (remove old one), then turn "Show custom banner" OFF (+press Submit), then turn it ON again (+press Submit). Lower banner heights are recommended to not take much space, for better page usability.
For Championship pages
You can add background image for championship page and/or for championship top panel. To do this, put .jpg files into web2py/applications/r2la/static/images/championships/ folder.
File name must be championship name, following this rules:
- if championship name contains spaces, in file name you should replace them with underscore _
- for page background image file add _bg to file name
- for top panel image file add _top to file name
Example: My_GT3_bg.jpg, My_GT3_top.jpg
Live Timing cross-domain ajax request
Use jsonp call at live/get_server_data_jsonp to get Live Timing server/driver data with cross-domain ajax request from your other server (may be used to create live servers/tracks/drivers widget). Data is updated once in 5 seconds, I do not recommend to request it more frequently.
Example call:
$.ajax({
    url: 'http://your-r2la-address:port/live/get_server_data_jsonp',
    type: 'GET',
    dataType: 'jsonp',
    crossDomain: true,
    data: {},
    success: function (data, textStatus, xhr) {
        console.log(data);
    },
    error: function (xhr, textStatus, errorThrown) {
        console.log(errorThrown);
    }
});
Returned data object structure is:
server_names_list: ['Server Name1', 'Server Name2', ...],
server_data: {
    "Server Name1": {
        session: session code (0=testday 1-4=practice 5-8=qual 9=warmup 10-13=race),
        track_name: "Track Name",
        vehicles: [
            {best_lap_time: lap time in seconds,
            driver_name: "Driver Name1",
            vehicle_class: "Vehicle Class1",
            vehicle_name: "Vehicle Name1"},
            { ... },
        ]},
    "Server Name2": { ... },
}
Championship Standings and Stats tables cross-domain ajax request
Use jsonp call at championships/export_standings_jsonp?cid=1 to get Championship Standings and Stats tables data with cross-domain ajax request from your other server. cid should be defined as championship ID. You can find championship ID in a query string when you open championship page.
Example call:
$.ajax({
    url: 'http://your-r2la-address:port/championships/export_standings_jsonp',
    type: 'GET',
    dataType: 'jsonp',
    crossDomain: true,
    data: {'cid': 1},
    success: function (data, textStatus, xhr) {
        console.log(data);
    },
    error: function (xhr, textStatus, errorThrown) {
        console.log(errorThrown);
    }
});
Session Report and Track Records cross-domain ajax request
Use jsonp call at report/get_report_jsonp to get Session Report data with cross-domain ajax request from your other server. You should pass 'file_name' as request var for xml file name.
Example call:
$.ajax({
    url: 'http://your-r2la-address:port/report/get_report_jsonp',
    type: 'GET',
    dataType: 'jsonp',
    crossDomain: true,
    data: {'file_name': '2020_06_27_08_16_10-54R1.xml'},
    success: function (data, textStatus, xhr) {
        console.log(data);
    },
    error: function (xhr, textStatus, errorThrown) {
        console.log(errorThrown);
    }
});
Use jsonp call at tracks/get_records_jsonp to get Track Records data with cross-domain ajax request from your other server. You should pass 'track_name' as request var for track name.
Example call:
$.ajax({
    url: 'http://your-r2la-address:port/tracks/get_records_jsonp',
    type: 'GET',
    dataType: 'jsonp',
    crossDomain: true,
    data: {'track_name': '24 Heures du Mans 2018'},
    success: function (data, textStatus, xhr) {
        console.log(data);
    },
    error: function (xhr, textStatus, errorThrown) {
        console.log(errorThrown);
    }
});
DEDI competition results cross-domain ajax request
Use jsonp call at dedi_comps/get_comp_jsonp to get DEDI Competition results with cross-domain ajax request from your other server. You should pass 'cid' (competition id) as request var for xml file name.
Example call:
$.ajax({
    url: 'http://your-r2la-address:port/dedi_comps/get_comp_jsonp',
    type: 'GET',
    dataType: 'jsonp',
    crossDomain: true,
    data: {'cid': '1'},
    success: function (data, textStatus, xhr) {
        console.log(data);
    },
    error: function (xhr, textStatus, errorThrown) {
        console.log(errorThrown);
    }
})
Hosting r2la on https
To host r2la server on https you will need to have valid ssl certificate (server.crt and server.key files, you can put them in rF2 Log Analyzer ver. x\web2py folder). Run web2py.exe with this parameters:
web2py.exe -c server.crt -k server.key
To host r2la with LiveTiming on https, add that parameters to third line in r2la_live_timing.bat, it will look like this:
start web2py.exe -c server.crt -k server.key